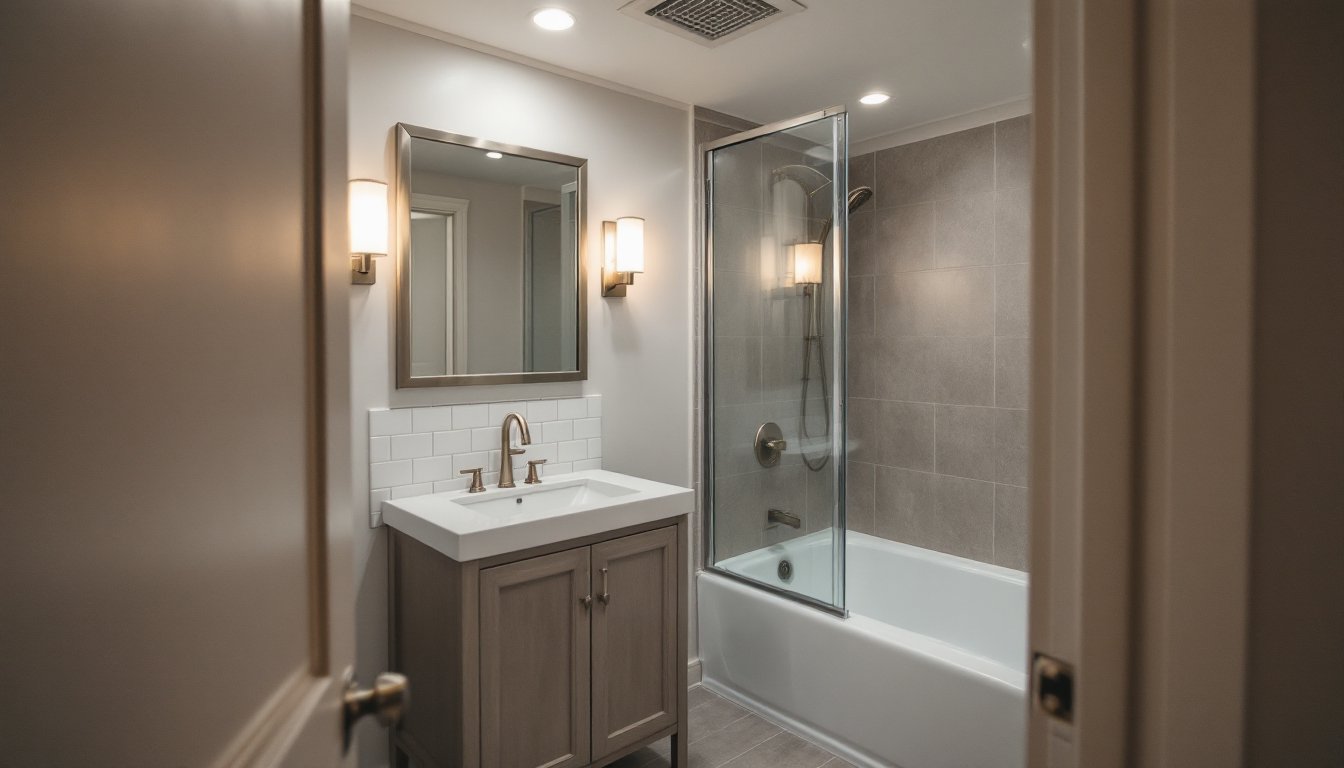
A bathroom vanity is often the first thing you notice when stepping into the room, and it does the heavy lifting in both form and function. Whether you’re planning a full gut remodel or a cosmetic refresh, choosing the right vanity makes the difference between a space that feels crammed and one that flows naturally. Home Depot bathroom vanities come in dozens of configurations, materials, and price points, which means you’ve got real options, but it also means you need a solid game plan before you shop. This guide walks you through sizing, styles, materials, and installation so you can nail the project without surprises.
Table of Contents
ToggleKey Takeaways
- Home Depot bathroom vanities come in transitional, modern, traditional, and floating styles with various materials—solid wood, engineered wood, MDF, and solid surface—each requiring specific waterproofing and maintenance for bathroom durability.
- Accurate measurements of rough opening, wall depth, and clearances are essential before purchasing; vanities come in standard widths (24–60 inches), but actual dimensions run 1–2 inches smaller, and double-bowl options require at least 21 inches of legroom per sink.
- Proper installation requires mounting into wall studs with rated fasteners, ensuring level surfaces to prevent water pooling, and correct drain slope of 1/4 inch per foot—professional plumbing work often costs $200–$500 and should not be skipped.
- Mid-range Home Depot bathroom vanities ($400–$900) offer the best balance of durability, design variety, and value; budget models last 5–8 years while premium options exceed 15+ years in humid environments.
- Water damage and hardware failure stem primarily from poor installation, uneven mounting, and skipped caulking rather than cabinet quality—taking time with level setup and sealant application ensures reliable performance for years.
Understanding Bathroom Vanity Styles and Materials
Popular Vanity Styles at Home Depot
Home Depot carries several classic vanity styles that work for different design directions. Transitional vanities split the difference between modern and traditional, clean lines but softer edges and warm finishes. These play well in most homes because they don’t feel trendy or dated. Modern vanities emphasize minimalism: flat-panel cabinetry, integrated sinks, and sleek hardware. They demand precise plumbing and square walls: any shimmy in the wall framing will be obvious.
Traditional vanities feature raised-panel doors, turned legs, and ornate hardware. They’re forgiving of imperfect walls and work in older homes, though they eat up visual space. Floating (wall-mounted) vanities give the illusion of an open bathroom and make floor cleaning easier, but installation requires finding studs and installing a robust mounting rail rated for the load (typically 100–150 lbs minimum). Home Depot’s selection includes all these types, though inventory varies by location and season.
Durable Materials and Finishes
Solid wood vanities, usually oak, maple, or birch, feel substantial and warm but require proper sealing in humid bathrooms. They’re heavier (60–150 lbs depending on width) and need solid mounting. Plywood or engineered wood is lighter and budget-friendly but more vulnerable to water damage if the edges aren’t sealed properly. The key is a quality waterproof finish: Home Depot stocks vanities with polyurethane or pre-applied sealers.
MDF (medium-density fiberboard) is common in budget vanities. It’s lightweight and stable, but once water gets into an unfinished edge, it swells and delaminates. Look for vanities with fully sealed or edge-banded MDF. Solid surface materials (like Corian) are non-porous, durable, and repair well if scratched, though they cost more. Marble or stone tops are gorgeous but expensive, porous (they stain and etch), and require periodic sealing. When choosing a finish, remember that gloss finishes show water spots and fingerprints: matte and satin finishes are more forgiving in bathrooms.
Sizing and Space Planning for Your Vanity
Measure twice, buy once. Start by measuring your rough opening (the width of the space where the vanity will go), wall depth (from the wall to the first obstruction, like a door swing or toilet), and the height of your sink outlet. Most vanities come in 24-inch, 30-inch, 36-inch, 48-inch, and 60-inch widths: these are nominal sizes. Actual dimensions run about 1–2 inches smaller, so a “30-inch” vanity is roughly 28–29 inches wide.
Ceiling height and clearance matter too. A standard vanity is 30–36 inches tall, but wall-mounted or elevated models can push closer to 36–42 inches. If your ceiling slopes, verify that mirror and lighting won’t hit the peak. For double vanities, aim for at least 21 inches of legroom per sink, less, and two people bump elbows. Check that the vanity doesn’t block the toilet swing or create a bottleneck at the door.
Acclimate your vanity before installation. Wood expands and contracts with humidity: let it sit in the bathroom for 24–48 hours before you install or attach the top. This is especially critical in older homes or climates with seasonal humidity swings. Check the legs or base for level, a vanity that rocks will stress plumbing connections and cause doors to bind.
Storage Features and Functionality
A vanity’s real worth is how much stuff it holds and whether you can access it during a morning rush. Single-bowl vanities (18–36 inches) work for solo bathrooms or guest spaces but feel cramped in a shared bathroom. Double-bowl vanities (48–72 inches) let two people prep at once and offer more counter space, though they take up more floor area and cost more.
Drawer depth varies: deeper drawers (18–22 inches) hold more but reduce usable counter depth if the vanity runs shallow (16–18 inches). Shallower drawers suit small bathrooms but limit storage. Look at drawer dividers, pull-outs, and adjustable shelves, these make daily use less frustrating. Open shelving looks modern but collects dust and clutter: enclosed cabinets keep things hidden and minimize water exposure.
Faucet mounting options also affect functionality. Single-hole faucets (common on smaller vanities) need less counter space but can look cramped on wide vanities. Widespread three-hole faucets (8-inch center-to-center spread) demand wider countertops (usually 30+ inches) and look more traditional. Verify that your faucet holes match the vanity pre-drills before checkout. Many Home Depot bathroom vanities come with the top pre-drilled: confirm this if you’re mixing and matching top and base.
Installation Tips for DIY Projects
Installing a vanity is a plumbing-and-carpentry hybrid project. Start by shutting off the water and emptying the supply lines. Disconnect the old vanity’s supply hoses (bring a towel), drain, and P-trap. Then unbolt the vanity from the wall studs or mounting rail. If it’s caulked to the wall, cut the caulk with a utility knife before pulling.
Position your new vanity using shims and a level, the top must be dead-level or water pools and soap scum streaks. Check front-to-back and side-to-side. Once level, screw the vanity’s mounting rail into the wall studs (minimum two 2.5-inch wood screws per stud for wall-mounted units). This old House and similar sources emphasize that fasteners into drywall alone will fail under load: hit studs every 16 inches if possible.
If your new vanity has a different footprint than the old one, you may need to reroute supply lines or relocate the drain. This is usually permit territory in most jurisdictions (codes vary: check locally). P-traps and drain lines must slope 1/4 inch per foot downhill to function: no siphoning occurs if they’re horizontal or uphill. Connect new supply lines last, use braided stainless steel hoses (they’re less prone to kinking than vinyl) and tighten by hand plus one-quarter turn with a wrench. Overtightening cracks fittings. Run water and inspect for leaks before closing up. Caulk between the backsplash and wall with paintable acrylic caulk (silicone stains easier and yellows over time): use a caulk gun and a wet finger to smooth the joint.
Budget-Friendly and Premium Options
Home Depot vanities span a wide price range. Budget models ($150–$400) typically use MDF or plywood with vinyl finishes and basic hardware. These work fine for rentals, guest baths, or temporary solutions, but don’t count on them lasting 15+ years in a humid master bath. Water damage and hardware failure are common after 5–8 years.
Mid-range vanities ($400–$900) upgrade to solid wood frames, better-quality drawer slides (usually soft-close), and real stone or solid-surface tops. These hold up well in most homes and offer good design variety. Remodelista and similar design sources often feature mid-range vanities as the sweet spot for remodels, enough budget to avoid the cheapest pitfalls without luxury pricing.
Premium options ($900+) feature all-wood construction, high-end hardware (Blum, Grass, or similar European brands), integrated lighting, and stone or quartz countertops. These belong in master baths or forever homes where you expect the vanity to outlast your mortgage. Contemporary bathroom designs on Houzz often showcase high-end vanities paired with custom tilework and lighting.
When evaluating cost, factor in installation labor (professional plumbers charge $200–$500 for supply and drain work alone) and any wall or framing repairs. A cheap vanity paired with sloppy installation wastes money fast. Set your budget and stick to it, impulse upgrades happen fast in a bathroom, and a $300 overrun stings more when it’s spread across multiple items.
Key Takeaways for Your Remodel
A successful vanity project starts before you walk into the store. Know your space dimensions, understand water supply and drain locations, and be honest about whether you can DIY the plumbing or need a licensed professional. Home Depot bathroom vanities offer real variety, you can find a solid, durable vanity at nearly any budget if you avoid the impulse trap and do your assignments.
Verify water connections, ensure level installation, and don’t skip caulking and sealing. Most vanity failures aren’t about the cabinet itself: they’re about rushed plumbing, poor surface prep, or uneven mounting that stresses joints over time. Take your time, and your vanity will serve reliably for years.